My sweet baby Katelyn graduated from kindergarten on thursday!
Sunday, May 29, 2011
Tuesday, May 17, 2011
Black and White Cookies
I just LOVE black and white cookies. I found this great recipe and thought I would share it with you!!
yield: Makes about 8 cookies
active time: 25 min
total time: 45 min
These dramatic cakelike cookies are a New York City favorite — and we think they deserve a wider audience.
Ingredients
- 1 1/4 cups all-purpose flour
- 1/2 teaspoon baking soda
- 1/2 teaspoon salt
- 1/3 cup well-shaken buttermilk
- 1/2 teaspoon vanilla
- 1/3 cup (5 1/3 tablespoons) unsalted butter, softened
- 1/2 cup granulated sugar
- 1 large egg
For icings
- 1 1/2 cups confectioners sugar
- 1 tablespoon light corn syrup
- 2 teaspoons fresh lemon juice
- 1/4 teaspoon vanilla
- 1 to 2 tablespoons water
- 1/4 cup unsweetened Dutch-process cocoa powder
Preparation
Make cookies:
Preheat oven to 350°F.
Whisk together flour, baking soda, and salt in a bowl. Stir together buttermilk and vanilla in a cup.
Beat together butter and sugar in a large bowl with an electric mixer until pale and fluffy, about 3 minutes, then add egg, beating until combined well. Mix in flour mixture and buttermilk mixture alternately in batches at low speed (scraping down side of bowl occasionally), beginning and ending with flour mixture. Mix until smooth.
Spoon 1/4 cups of batter about 2 inches apart onto a buttered large baking sheet. Bake in middle of oven until tops are puffed and pale golden, and cookies spring back when touched, 15 to 17 minutes. Transfer with a metal spatula to a rack and chill (to cool quickly), about 5 minutes.
Make icings while cookies chill:
Stir together confectioners sugar, corn syrup, lemon juice, vanilla, and 1 tablespoon water in a small bowl until smooth. Transfer half of icing to another bowl and stir in cocoa, adding more water, 1/2 teaspoon at a time, to thin to same consistency as white icing.
Ice cookies:
Turn cookies flat sides up, then spread white icing over half of each and chocolate over other half.
Sunday, May 15, 2011
Cuff Bracelets
Last night I was cleaning my sewing room and found a bunch of supplies I had purchased at one time but forgot about (shocking!)
One of those things were metal cuff bracelets. So, I decided to stop organizing and make bracelets instead. (ADD is a wonderful thing! ha ha)
I had an old pair of jeans lying around that I cut apart to make these little denim sleeves to feed the metal cuffs into. For one of the bracelets I used demin on one side and chocolate suede on the other side. Then I started digging through my supplies looking for stuff to decorate these bracelets with. I added a fabric flower I made a while ago to one of the bracelets and I strung some buttons and washers to hemp cord for the other bracelet and waa laa!!
I should probably get back to organizing the sewing room now! ha ha
One of those things were metal cuff bracelets. So, I decided to stop organizing and make bracelets instead. (ADD is a wonderful thing! ha ha)
I had an old pair of jeans lying around that I cut apart to make these little denim sleeves to feed the metal cuffs into. For one of the bracelets I used demin on one side and chocolate suede on the other side. Then I started digging through my supplies looking for stuff to decorate these bracelets with. I added a fabric flower I made a while ago to one of the bracelets and I strung some buttons and washers to hemp cord for the other bracelet and waa laa!!
I should probably get back to organizing the sewing room now! ha ha
Friday, April 29, 2011
Adventures of the TOOTH FAIRY
I may be the WORST tooth fairy ever! My little Katelyn lost her very first tooth yesterday and I made her the cutest little monkey tooth fairy pillow, we made a big deal about putting her tooth in the pillow before she went to bed, I got them all tucked in last night and then I went to get some work done on the computer. I was up late and pretty exhausted.
This morning Katelyn comes running down the stairs screaming, "Mommy, I don't know if the tooth fairy came last night, let's go check!!" ..........All I was thinking was "CRAP!!!!!!!! I suck at being the tooth fairy!!!" So I said to Katelyn (while I was digging in my purse for quarters), "You need to go potty first, and then we can go check!" She said "Mommy, I don't have to go potty!" I said "Katelyn just go potty first" As she rushed to go to the bathroom, I sprinted upstairs like a mad woman and flew into her bedroom and grabbed the tooth and shoved two quarters in the pillow. I turned around and ran out of her room and Ava is flying up the stairs after me, then here comes Katelyn. This is where I could probably win an Oscar.....I said (out of breath at this point), "Let's go see if the tooth fairy left you anything" .....We went and looked and sure enough she was absolutely delighted to pull out two shiny quarters from her tooth fairy pillow! she said "Mommy, do you think that people will think these are regular quarters, or will they know that they are tooth fairy quarters??" lol She said, "I thought I heard that little fairy come in my room"...........maybe if the tooth fairy sounds like a herd of elephants running up the stairs! ha ha
That was WAY to close!!
Thursday, April 28, 2011
60 DAY CHALLENGE
My friend didn't believe me when I said I was going to blog about this. One of my dear friends and I have decided that we cannot put off the gym any longer. So, starting Sunday, May 1st and going to Thursday June 30th.............we have challeneged each other to see who can make the biggest change in 60 days........weight loss muscle etc...........
As if that isn't going to be hard enough, the LOSER has to post their BEFORE picture on the Facebook page for 24 hours...........I'm talking, the most unflattering, wearing just a 2 piece bathing suit picture!!
I would rather shave my head and decorate it like an Easter egg before I would want to ever post my BEFORE picture for the world to see!! (OK, maybe not the world, but everyone I know)
Wish me luck!! (as I eat my last Snickers bar........ lol)
Tuesday, April 26, 2011
My Little Hat Models!
I am so glad I have two little girls that are so willing to be my little models for the things I make. Although, I have noticed that they are becoming the little Diva's in front of the camera. I was out shopping with Ava, my 4 year old, and she said "Mommy, you can take my picture in every store we go in if you want"..... She then preceded to model for me every 100 feet and insisted I take her picture, next to a garbage can, a sock display..... any random thing she could find to stand next to! ha ha
Monday, April 25, 2011
The Importance of a Clean Sewing Machine!
I don't know about all of you, but I get so caught up in one sewing project after another that I forget how important it is to clean my sewing machine. You wouldn't believe the amount of lint that builds up in all those little nooks and crannies on your machine. All this extra lint and thread can cause a number of stitching problems as well as possibly jamming up your machine. You know how expensive your machine is, and even more, how important it is to you and your craft, so keep it happy =)
Summer is coming up, and so are long weekends and family trips. This would be a great time to have your machine serviced, since you'll be busy and won't miss it ;) Check out the local vaccuum machine stores, they seem to service many types of sewing machines. Of course if there is a Singer, Bernina, Brother, etc. store around and that's the type of machine you have, you may want to take it there, since they would be experts on your particular machine!
I am so glad God invented COFFEE!
It was hard to get going this morning after a long weekend! I hope you all had a Happy Easter and a wonderful time with family and friends this weekend. My weekend was full of painting, planting flowers and organizing etc, etc. I had so much to do this weekend, and I felt like I was working the entire time, yet as I was turning off all of the lights and heading to bed last night, I wondered what, exactly, I got accomplished since my house now looked like it was worse off than before I started!! ha ha
Tuesday, April 5, 2011
Attaching an Exterior Zipper Tutorial
With right sides facing pin the interior lining piece that has no interfacing to the exterior of
the purse. With a fabric pen and a ruler you will be drawing a rectangle that is 1.5” down
from the top and 1.5” in from the right and left side. The rectangle will be 1/2 inch tall. (see
diagram)
Machine stitch along the marked rectangle. Cut a slit in the center of the rectangle stopping
about 1/4 inch from either end then angled out to the corners. Don’t cut through your stitching. Push the lining fabric through the window to the back side of exterior pressing the seam away from the center.
Secure the zipper in place using pins, glue or fusible tape. If your zipper is longer than the
window, that is OK. Line it up so that when closed the zipper pull is at one end of the window.
The excess will be cut off the other end after the zipper is sewn in place.
Place the zipper on the lining side so it is right side up in the window on the exterior side.
Stitch around all four sides of the rectangle. Keep stitching close to the seam line where the
exterior fabric & the lining meet. Be sure the lining fabric is flat & out of the way before stitching.Saturday, January 22, 2011
Gift Certificates are Here!!
Good morning everyone! I hope you're having a great start to your weekend. I just wanted to let you know that I now have gift certificates available in my Etsy store. www.thecrochetdiva.etsy.com
If you comment below about this post, as well as purchase a gift certificate I will add on an additional $5 for FREE for you!
Have a great weekend!
If you comment below about this post, as well as purchase a gift certificate I will add on an additional $5 for FREE for you!
Have a great weekend!
Friday, January 14, 2011
Thursday, December 30, 2010
Holidays
Oh my goodness, it's been a while since I have blogged. The holidays have kept me so busy, that I don't know where any of my time goes! Over Christmas I finished an afghan for my Mother, that she had been asking for, for a couple years now. I think it turned out pretty nice, I need to get a picture and post it.
Yesterday I found the cutest little pattern on line for an "apple cozy". I wasn't really sure why anyone would need an apple cozy, but this pattern was so unique. It is an Irish cabled apple jacket and I even added a Celtic button to top it off. I actually brought my apple to work in it today! ha ha The crochet pattern credit goes to Kim Miller. Thanks for making such a cute pattern!
Friday, September 10, 2010
Meet Elvis Presley!!
The girls and I just adopted a new little Boxer puppy and we ( I ) named him Elvis Presley! He is so sweet, the girls adore him!
And as much as I said I would never have a dog on my bed, etc. That little stinker sleeps curled up in bed with me every night!
So if there is anyone out there with puppy training advice I would LOVE to hear it!
xoxo
Friday, August 27, 2010
Happy Friday
"Every great dream begins with a dreamer. Always remember, you have within you the strength, the patience, and the passion to reach for the stars to change the world."
-Harriet Tubman
Thursday, August 26, 2010
FREE PATTERN OFFER!!
If you purchase the new MODISH MESSENGER Bag pattern and email me photos of your finished bag and your feed back of how the pattern worked out for you, I will email you a FREE pattern of your choice! Your photos may even be featured in my pattern listing!!
Thank you for supporting HAND-MADE!!
Happy sewing!
Thank you for supporting HAND-MADE!!
Happy sewing!
Wednesday, August 25, 2010
((NEW PATTERN)) The MODISH MESSENGER Bag
The MODISH MESSENGER is just perfect for anyone needing a fashionable, well organized space for all of their things. Whether you’re taking it to work, school or just about anywhere you go, you’ll soon realize you won’t want to be without this bag!
Fully lined with heavy interfacing, this bag is not only stylish, but it’s durable too! A convenient full size exterior pocket is just perfect for your files, folders or a great magazine. Inside you’ll find there is room spacious enough to fit most laptops. The lined interior pocket is the perfect hideaway for your wallet, cell phone or anything else you need at a moments notice. The large exterior flap makes it easy to get in and out of your bag in a flash. A sturdy adjustable strap allows you to wear this over your shoulder or across your chest or back, messenger style.
What is the best part about the MODISH MESSENGER, you ask??
The timeless design and sleek lines make this the obvious choice for a male or female! Depending on the fabric used when creating this bag it can be as masculine or feminine as you’d like it to be. The design, fabric and color combinations are endless!! This would also make a great diaper bag for the trendy new Mom!
With this SEWING PATTERN, you’ll be able to make your very own MODISH MESSENGER Bag!
For added clarity, this SEWING PATTERN includes full size pattern pieces along with fully illustrated instructions.
This is a PDF SEWING PATTERN that will be emailed to you within 48 hours of your purchase. (usually sooner)
SKILL LEVEL: Beginner/Intermediate
Measurements:
*15" wide x 13" high
* 4" gusset
*Fully lined and reinforced
*Full size exterior pocket
*Large interior accessory pocket
*22"-45" adjustable strap that can be worn messenger or shoulder style
Friday, August 20, 2010
Little Hands............. 7/31/2010
This obviously used to say "The Crochet Diva" until my darling little three year got her hands on it and decided it should say "The Croch Diva" instead.... I don't think I'll be changing the company name just yet. Ha Ha
Sew, Sew, Sew..... 7/19/2010
Tonight is going to be a very busy night! Once I get home I have nine purses to make! I have them prepped and cut out already so hopefully it will go pretty quickly from this point. I have some new leather purses to show you soon, so keep your eyes open, I hope to list them in the next day or two!
Thought for Saturday morning.......... 7/17/2010
Introducing AUDREY............ 7/13/2010
I'm just launching a new line of upscale handbags, purses and totes. They will be made out of more upscale fabrics, including leathers and silks. Keep checking back for new additions!
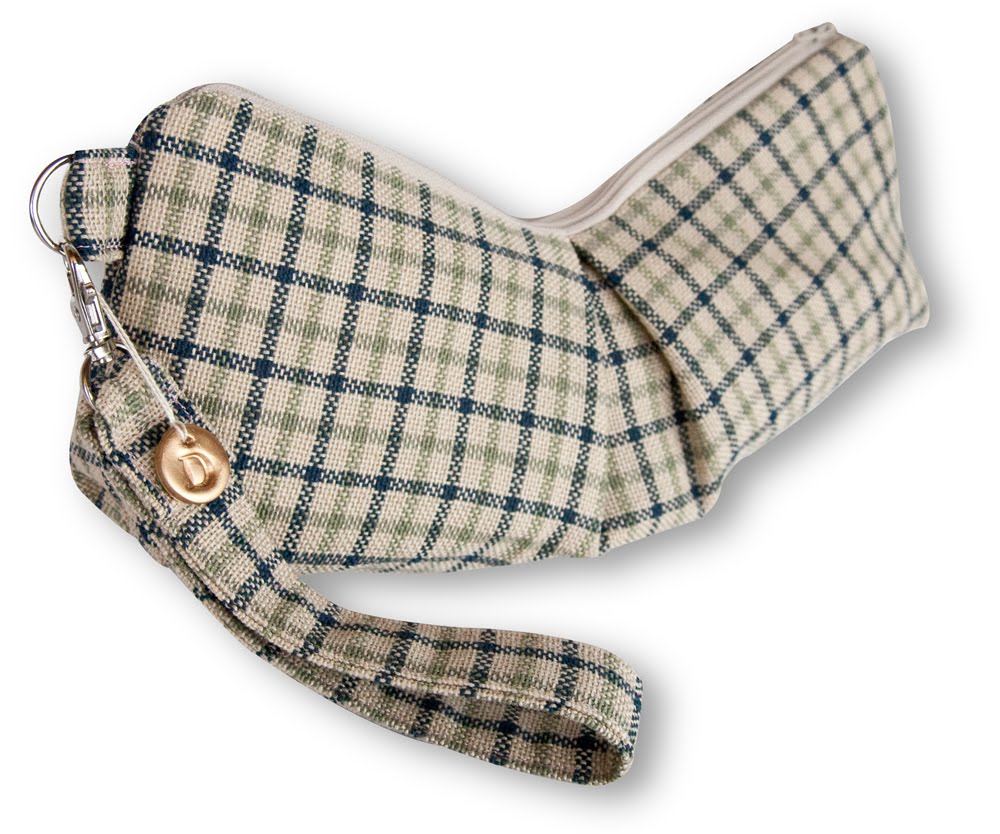
Audrey is sophisticated and stylish all wrapped up in an elegant package. This fabulous little purse is just what you need to carry around all of your essentials.
Audrey is 12" long, 5.5" tall and 3" deep. Just the right size! This purse has a convenient wristlet strap, making it effortless to carry. You might also choose to carry this purse as a clutch. The wristlet strap detaches for your convenience.
This purse is fully lined and interfaced for extra durability and has a zippered closure.
To add that last touch of class, Audrey comes with a handmade Diva "D" pendant that has been painted in goldleaf making this bag as elegant as you are.
Subscribe to:
Posts (Atom)


.jpg)